GIMP - Part 01

GIMP is a free and open-source raster graphic design software used for image manipulation and editing, photo retouching, image composition, and image construction. GIMP is released under GPLv3+ license and is available for Linux, macOS, and Microsoft Windows.
The Working Environment
1. The Main Toolbox
It is possible to open or close the tools in this box for editing graphics.
For the purpose, follow:
Edit → Preferences →Toolbox → The tools can be enabled or disabled.
Selection Tools
Name → Shortcuts → Description
Rectangle → R → Selects the required area as a square or rectangular region.
Ellipse → E → Selects the required area as a circular or elliptical region.
Free (Lasso) → F → Draws free-form selections
Fuzzy (Magic Wand) → U → Selects areas on color similarity.
By Colour → Shift + O → Selects all instances of color in a graphic.
Scissors → I → Creates paths to select shapes
Foreground → - → Selects a region containing foreground objects.
Brush Tools
Name → Shortcuts → Description
Bucket Fill → Shift + B → Fills an area with a color or a pattern.
Blend(Gradient) → L → fills the selected area with a gradient blend
Pencil → N → Paints hard-edged lines; that is, the pixels are not anti-aliased.
Paintbrush → P → Paints soft-or fuzzy-edged lines; that is, the pixels are anti-aliased and/or feathered.
Eraser → Shift + E → Erases pixels from a layer.
Airbrush → A → Paint tool with variable pressure to spray colors on a graphic
Ink → K → Adds color to a graphic, like a paintbrush. The quick movement of the mouse minimizes the size of the brush. Slow movement makes its vice versa
Clone → C → Copy pixels from one part of a graphic to another.
Heal → H → Resolves image irregularities removing unnecessary colors and spots Perspective
Clone → - → Clones from an image source after applying the perspective transformation.
Convolve → Shift + U → Blurs or sharpens an image
(Blur/Sharpen)
Smudge → S → Dampens graphic
Dodge/Burn → Shift + D → Lightens or darkens an image's shadows, mid-tones, or highlights.

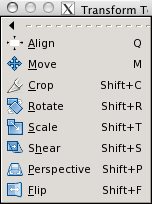
Transform Tools
Name → Shortcuts → Description
Move → M → To shift or move a selection
Align → Q → To align or arrange layers or objects
Crop → Shift + C → Crops or clips the image
Rotate → Shift + R → Rotates the active layer, selection, or path.
Scale → Shift + T → Scales the active layer, selection, or path
Shear → Shift + S → Shifts part of the image in some direction.
Perspective → Shift + P → Changes the perspective of the active layer, selection, or path
Other Tools
Name → Shortcuts → Description
Path → B → Allows selecting and modifying paths
Colour Picker → O → Selects the color of any image opened on your screen.
Magnify(Zoom) → Z → Alters the zoom level of the image
Measure → Shift + M → Shows distances and angles
Text → M → Places text into the image
2. Tool Options: The Tool Options are available to customize the options for a tool.
3. Image Window: Helps display the graphic created. It is possible to keep several windows open to suit selection. In this situation, several windows will be open at the same time. Or else one window can be kept open and use others as necessary. For this purpose, select:
Windows → Single-Window Mode
4. Layers, Channels, Paths: These are shown as Tabs and can be clicked open when necessary.
5. Brushes/Patterns/Gradients: These tabs help create and add color to a graphic.


The Photo Editing is a professional clipping path service company based in India, operated by dedicated and highly experienced professionals.
ReplyDeletePost a Comment